The Kitchen
Public Discussion Group
Public Discussion Group
Active a week ago
Public Discussion Group
Organizer:
- Organized by
-
-
Cookbook
-
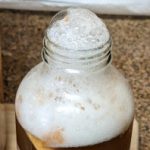
Kombucha!
I’d like to preface this by saying I just learned how to do this by watching a few youtube videos. So if you prefer to watch some videos about the process, there are many good ones out there. This is a lot of text, but honestly making kombucha is REALLY EASY once you do it a couple times.
These instructions assume you have a SCOBY to do the fermenting. If you do not have a SCOBY yet, you can get one in a number of ways:
1) Buy a bottle of GTs kombucha from the store (or any other brand that is unpasteurized; you want to make sure the bottle has the sediment, this is needed to grow the culture). Preferably one that is unflavored, but it doesn’t matter that much. Pour the bottle into a gallon glass jar and let sit out of sunlight for several weeks. A SCOBY should start forming on the surface. Once it’s about 1/2 thick it’s ready to use.
2) Get a SCOBY from a friend or buy one online.
3) Supposedly you can convert a vinegar mother into a kombucha SCOBY but I have never tried it.
First Ferment – Unflavored
Standard One Gallon Brew
Typical single gallon brewing. Requires 1-gallon jar and 1 SCOBY.
Total Volume 9 cups water + 4 cups tea + 1 cup SCOBY juice or kombucha = 14 cups
Yields 6-8 servings of around 1 pint each (after flavoring is added).
1. Put 9 cups of water into gallon glass jug
2. Add 1 cup sugar and stir until sugar is dissolved
3. Boil 4 cups of water – up to 200-210 degf for black tea, 180 for green; if using both, put the black in first and then add the green a few minutes later after water has cooled below 200
4. Remove from heat
5. Add 12 grams of tea (6 bags of 2g size)
6. Steep 20-25 min
7. Pour tea into glass jar with remainder of water
8. LET SIT and cool to room temperature (no higher than 90 degrees or you may scald the SCOBY)
9. Pour in 1/2 cup of SCOBY hotel juice OR plain unflavored kombucha batch, if possible
10. Add the SCOBY. Don’t worry if it doesn’t float perfectly on the surface
10. Cover with cloth and put in pantry for about 7-10 days
General Ratios – In case you want to do smaller or larger batches
1 cup of sugar per gallon
12 grams of tea per gallon (black tea recommended; green tea can be used but will be weaker; mix works)
By following the general ratios, you can make much larger batches if you have the need
Per gallon, reduce sugar to 3/4 cup for more sour kombucha, or increase to up to 1 1/2 cup for sweeter
Tips/Reminders
· Do not try to fit a full 16 cups of liquid into gallon glass jar as there will be no room for the SCOBY and the risk of making a mess via sloshing drastically increases. Stick to the 13-14 cup range for this jar size.
· Remember to set aside 1/2 to 1 cup of your kombucha for the next batch, so your drinkable yield will always be a bit less than you brew, unless you are taking starter juice out of SCOBY hotel instead.
· If you end up with too much liquid for the SCOBY to fit comfortable into the jar for brewing, put excess tea into the SCOBY hotel (once it’s cooled down!) or just drink it freshly brewed. If you add unsweetened tea, give the SCOBY some sugar, too.
· Use filtered water (either bottled or filtered). Don’t use straight tap water – the chemicals like chlorine can hurt the fermentation process.
· In cooler temperatures, the initial ferment may take closer to 2 weeks or more. How to tell if the gallon is done fermenting? It should have sediment at the bottom of the jar, carbonation bubbles at the top of the jar, and the liquid should be notably lighter than freshly brewed tea. You can also taste test it.
Second Ferment – Flavoring
In this step, the unflavored kombucha is combined with some flavoring and put in air-tight serving-size bottles. This fermentation stage is only for a couple days; just long enough for the flavoring to mix in well with the kombucha and for added sugars to ferment slightly.
This step is not necessary (you can drink it unflavored, or you can flavor it with liquids that will diffuse quickly and not allow time for more fermenting) but doing this step will enhance the flavor and (most importantly, to some) will allow for carbonation buildup, giving you a drink with a fizzy, soda-like zing.
This step is largely free-form and experimentation to find flavors and ratios to your liking. Your main options are ‘clean’ liquids (syrups, juices), pulpy juices (fruits run through blender or grated), or chunks (chopped fruit).
Reusing store-bought kombucha bottles is great. The glass is strong, the lids are strong, and the bottles won’t need burping. You can also use mason jars or any other sturdy glass jars with a lid that will resist a strong pressure build-up from the fermentation.
Be aware that regular metal mason jar lids, since they seal well but are thin, may get bent and damaged from the pressure. I do not recommend doing second stage ferment in anything larger than 1-quart jars. The pressure buildup can be quite intense and larger jars may burst.
Here are some sweet things that I’ve found work well for a 1-pint bottle serving.
1/8 to 1/4 cup of chopped or pulped fruit (fresh or dried)
Pineapple and mango are my favorites, but I’ve also used apples, cranberries, kiwi, and more!
1 tsp molasses (if you like molasses; a little goes a long way)
1 tbl maple syrup (real stuff, not sugar- or corn-based ‘table syrups’) or fruit juices
You can also add some things without sugar to spice the bottle up without adding more sweetness.
Around 5g or one “node” of ginger root, peeled, sliced/diced or grated
Lemon or lime (chopped, juiced, or zested) – 1 tsp of lemon juice per bottle is enough for me
Lemon & ginger is a great combo especially if you want something low in sugar!
Herbs and/or a pinch of salt
Instructions
1. Add the flavorings to bottle and pour in the kombucha. Leave some headroom to handle foaming when opened. Close up the lid tightly.
2. Place in cabinet or pantry for 2-3 days. I recommend that you gently rotate the bottles (turn upside-down) once or twice a day. This helps prevent a new SCOBY from forming on the surface (which won’t hurt you or the drink, but could make the texture unpleasant, especially if you wanted to just drink without straining but the fruit all gets fused together in a slimy lump.) Don’t shake the bottles!
3. After 2-3 days, move to refrigerator to slow the fermentation and chill for drinking.
4. Drink cold. If pulp or chunks are not to your liking (or if a blob forms), strain while pouring from bottle.
-
Here’s an easy one. Spaghetti the way my mom always made it.
Spaghetti
1 lb ground meat
1 large onion, chopped
3-5 cloves of garlic, crushed
1/2 lb mushrooms, chopped (if using canned mushrooms, drain them well)
14 oz stewed tomatoes
14 oz tomato sauce
12 oz tomato paste
1 tablespoon oregano
1 tablespoon basil
1 tablespoon chili powder
1 bay leaf (optional)
Salt, pepper, sugar to taste
In 6-8 quart pot or dutch oven, add meat, onions, and garlic. Cook on medium heat until meat browns.
Add tomatoes and mushrooms. If using cans, rinse with a dash of water.
Add seasonings and stir well.
Reduce heat and simmer for 15 minutes, stirring occasionally, or until onions and mushrooms reach desired texture.
Serve hot on your preference of pasta!
</div>
-

I am making this today! Thought i’d share 😃
Curried Basmati Rice (Yield 6-8 servings)
2 cloves of garlic
1 medium onion
1 tbsp of extra-virgin olive oil, avocado oil, or coconut oil
1 tbsp butter (unsalted)
1 1/4 tsp of curry powder
1 cup of your favorite peas (I use sweet green peas, tastes best with this dish!)
3/4 sea salt (alter if your butter has salt in it, or to needs/preference.)
3 cups of clean, filtered water
2 cups of brown Basmati rice
1.) Mince the garlic if you have cloves. Skip this step if you have minced garlic. Finely chop the whole onion.
2.) Heat the oil and butter in a 4-quart casserole, add the garlic and onion, and saute over med heat for 2 minutes.
3.) Add the curry powder and saute briefly. Add the salt and water and bring to a boil. Add the rice after thoroughly washing it, (lots of debris will come off it) reduce heat, cover, and simmer for 30 minutes; add the peas, but do not mix into the rice. Replace the cover and continue cooking for another 15-20 minutes, or until the rice is tender. Fluff with a fork, mixing in the peas, before serving.
Really easy! And tasty!
-

Brussel spouts with balsamic vinegar, bacon and Bleu cheese.
3 strips of bacon
1 pound Brussel spouts
1 1/2 tbs balsamic vinegar
2 ounces Bleu cheese.
In a large skillet cook bacon over medium heat,cut spouts in half, remove bacon after fully cooked and crumble, drain grease into a measuring, add 2 tablespoons to skillet, add spouts and brown. In a bowl mix Brussel spouts, bacon, balsamic vinegar and Bleu cheese. Mix and enjoy.
-

Thanks. Have to show this one to Nancy. We love Brussel sprouts. Dogs wiped them out this year. Usually look forward to that first frost when they sweeten up.
-
-
We still need more recipes for our cookbook. Please send us your favorite meal.
-
Well…. if you start with a pound of bacon and fry it all up, then if you prepare this dish fast enough you may have the necessary 3 strips left.
-
Bwah haha! I can eat half a pound with no aftereffects! In fact I feel sooo good lol
Log in to reply.